| View previous topic :: View next topic |
| Author |
Message |
alloy
T56 Elitist

Joined: 25 Jan 2004
Posts: 1716
Location: Vancouver, WA
1987 Chevrolet Camaro IROC-Z
|
 Posted: Sun Sep 14, 2008 4:02 pm Post subject: Easiest and cheapest mod I've ever done to my car! Posted: Sun Sep 14, 2008 4:02 pm Post subject: Easiest and cheapest mod I've ever done to my car! |
 |
|
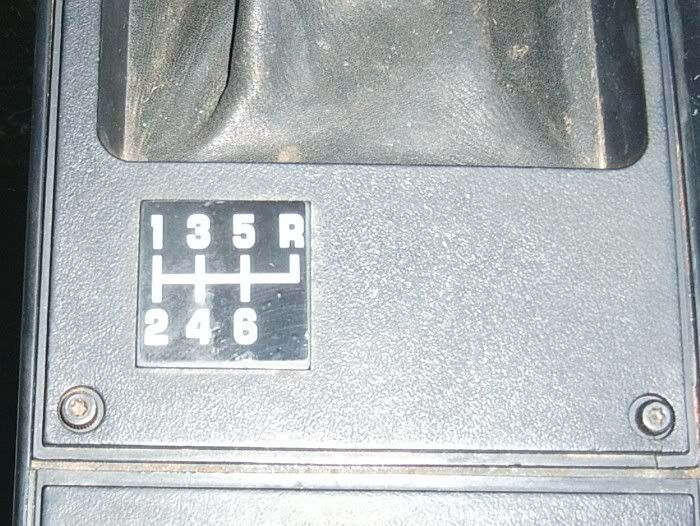
Boy...........can't tell you how many problems this little decal solved for only $7.50 with shipping! And only took 5 mins to install!!! Almost instant gratification!
Before installing this I had no reverse. Car just wanted to only go forward. I put the gear shifter where reverse is supposed to be, but no dice......just kept trying to go forward. Only cost me $7.50 to fix reverse 
 |
|
| Back to top |
|
 |
Dewey316
The Lama

Joined: 08 Jan 2004
Posts: 7295
Location: Bringing the tech
1990 Chevrolet Camaro RS
|
| Posted: Sun Sep 14, 2008 4:50 pm Post subject: |
|
|
Hey Dan... Using your Boeing break for good stuff I see.
How did the trans swap go? pictures of that? |
|
| Back to top |
|
|
alloy
T56 Elitist
Joined: 25 Jan 2004
Posts: 1716
Location: Vancouver, WA
1987 Chevrolet Camaro IROC-Z
|
| Posted: Sun Sep 14, 2008 5:41 pm Post subject: |
|
|
Yes, not much else to do, except walk the picket line for 4 hours every 12 days and wave my sign and yell at cars going by.
The install took about 4 days total taking away time for running parts. I already had everything I needed (or so I thought) Turns out LT1 pull clutches use longer pressure plate bolts and couldn't get the exact length I needed (too long) But the flywheel was drilled all the way through, just not tapped all the way. So 20 minutes with a sharp tap and some tap majic and that was taken care of. I didn't get a dust cover with my T56 setup, so I made one. Took a few hours but it turned out ok. I don't have any way of bending the edges, so it's just flat but doesn't rattle or make noise and clears everything. I also had to space my shifter handle over 3/4" to the left. I may go another 1/4", but unless you look carefully it's not noticeable and doesn't make much difference driving it.
I have Alston SFC's and I found out that a Spohn T56 cross member for a Spohn torque arm does not clear the SFC's. Half a day cutting and fitting that and it was in place. Then my drive shaft wouldn't turn after putting a new Rockland Standard Gear "no walk" long tail shaft bushing. Waited for a call from Rockland for about 5 hours, but got that solved in 10 mins after he called. I love the double length bushing, but hate the instructions that came with it.
Anyway got the clutch in, bell housing on, and put the trans in place. Had to cut the floor board back about an inch to clear the T56 shifter box.
The decided I'd do my hydraulics. Everyone said you could just use the 4th gen braided braided stainless clutch line with the 3rd gen cylinders. Not...................the fitting on the master and slave aren't the same. So I ended up using the 4th gen hydraulics. I'd heard that the clutch engages way up with the 4th gen parts and they were right. Hard to get used to that.
Anyway today I put my Hurst comp plus shifter in, 3 quarts of Mobil 1 synthetic ATF and buttoned everything up and took it for a test ride. To say this thing shifts like butter in a gross understatement. Makes the T5 feel like an old granny 4 spd. truck trans. My speedometer cable mod to the trans works perfectly, steady needle, no bouncing at all.
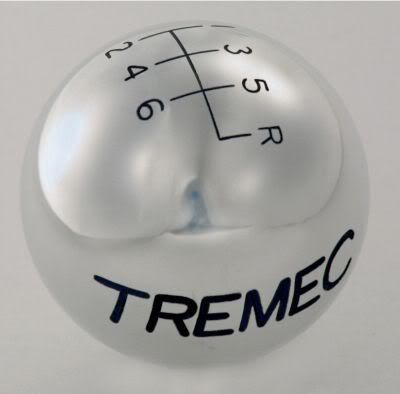
I got lucky and chose all the right parts and went by the numbers putting the trans together and I can't be happier. Last thing to do is put my new Tremec shift knob on when it gets here. Can't be running around with a 5spd. pattern on my shifter now can I?
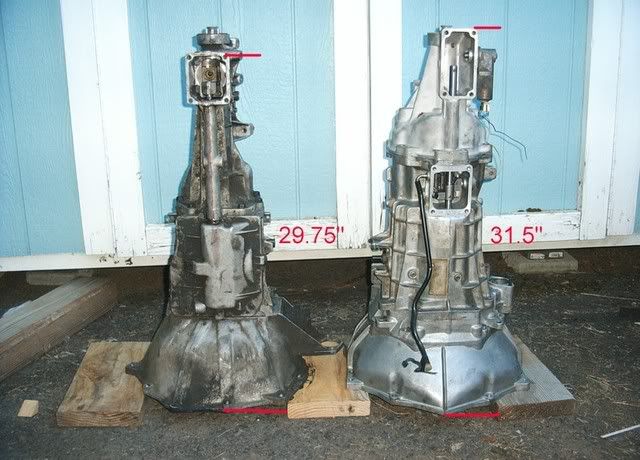
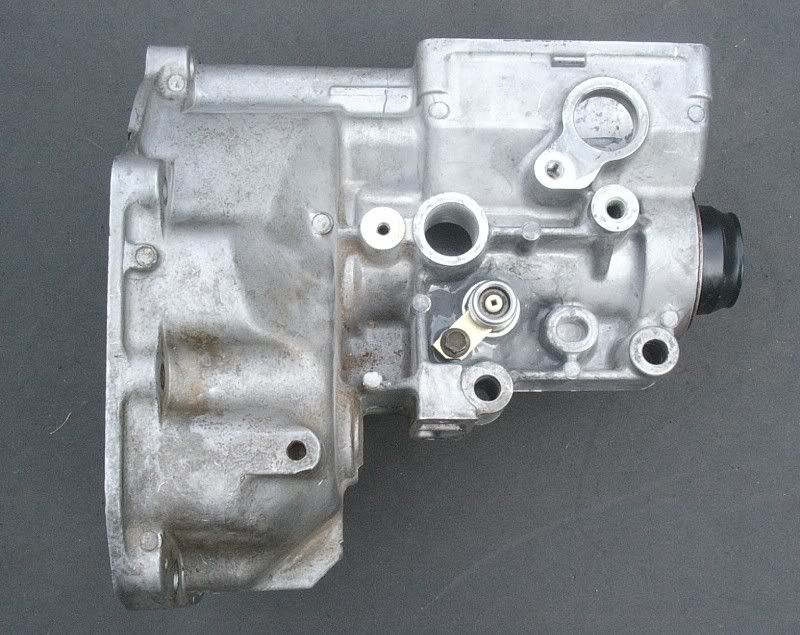
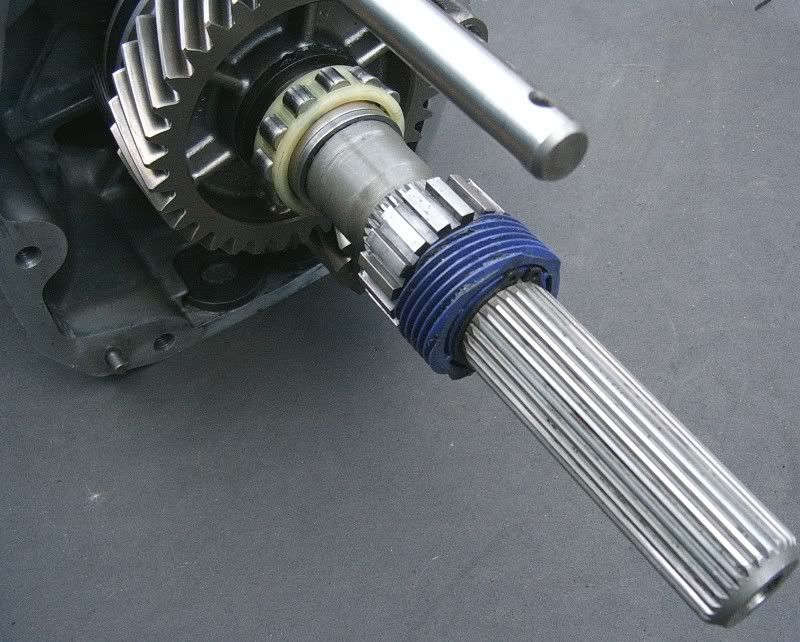
I don't have many pics, but I did take a pic of how much I needed to cut the floor pan and the T56 and T5 side by side. I do have a pic or two of the mods I do to the tail housing to allow the use of a speedometer cable.
Last edited by alloy on Mon Sep 15, 2008 10:42 am; edited 1 time in total |
|
| Back to top |
|
|
GREG DAVIDSON
Member

Joined: 15 Mar 2008
Posts: 1159
Location: Salem
1989 Pontiac Formula
|
| Posted: Sun Sep 14, 2008 5:50 pm Post subject: |
|
|
| nice job ! thats been one of my dreams to put the 6 speed in and auto out |
|
| Back to top |
|
|
Twilightoptics
Hardcore (12sec Club)

Joined: 13 Jan 2004
Posts: 9191
Location: Auburn , WA
1987 Chevrolet Camaro IROC-Z
|
| Posted: Sun Sep 14, 2008 7:30 pm Post subject: |
|
|
Good to know the LT1 style T56 needs the shifter moved too. No one seemed to mention that when I put my LS1 style one in. Had to move it forward and over about an inch like you've said.
You'll love it! |
|
| Back to top |
|
|
alloy
T56 Elitist
Joined: 25 Jan 2004
Posts: 1716
Location: Vancouver, WA
1987 Chevrolet Camaro IROC-Z
|
| Posted: Sun Sep 14, 2008 8:25 pm Post subject: |
|
|
I didn't have to move the shifter forward, just to the left. But that's probably the difference in an LS1 verses an LT1 box.
After 5 miles I already love it and I still have the 3.42's in. I'm really debating sticking with the 3.42's......but then again the rpm difference between 3.42's and 3.73's is only 112 rpm more. So not much a difference. And the rear I got from you Paul is already set up for disks and ready for my LS1 style rear disk brakes, and my 3.42 rear is drum. I think I could sell the rear that's in the car with the drum mounts still in place easier than if I cut it for the disks. It's got good gears and a Zexel, I'm sure it would sell.
I also went ahead and got bronze fork pads for the entire trans, along with the solid 3/4 syncro keys, steel 3/4 fork, and longer tail housing bushing. When I pulled this trans down the the 5/6 pads were busted up, so for $100 I put all bronze in and didn't look back. Even after only 5 miles of driving with it, I feel it's worth every penny I spent. The hours spent checking and shimming everything, checking every single part in the trans, reading every bit of info I could find is really worth it. Feels good to build a trans that most people are scared to touch. If you can change a cam, you can build a T56. |
|
| Back to top |
|
|
iansane
Member

Joined: 16 Jan 2004
Posts: 5742
Location: Bothell
1991 Pontiac Trans Am
|
| Posted: Sun Sep 14, 2008 8:51 pm Post subject: |
|
|
| alloy wrote: | | If you can change a cam, you can build a T56. |
Ain't that the truth! 
Awesome mod!
_________________
| Quote: | | Sometimes I actually think I'm slightly retarded in the mouth. |
|
|
| Back to top |
|
|
alloy
T56 Elitist
Joined: 25 Jan 2004
Posts: 1716
Location: Vancouver, WA
1987 Chevrolet Camaro IROC-Z
|
| Posted: Thu Sep 18, 2008 3:17 pm Post subject: |
|
|
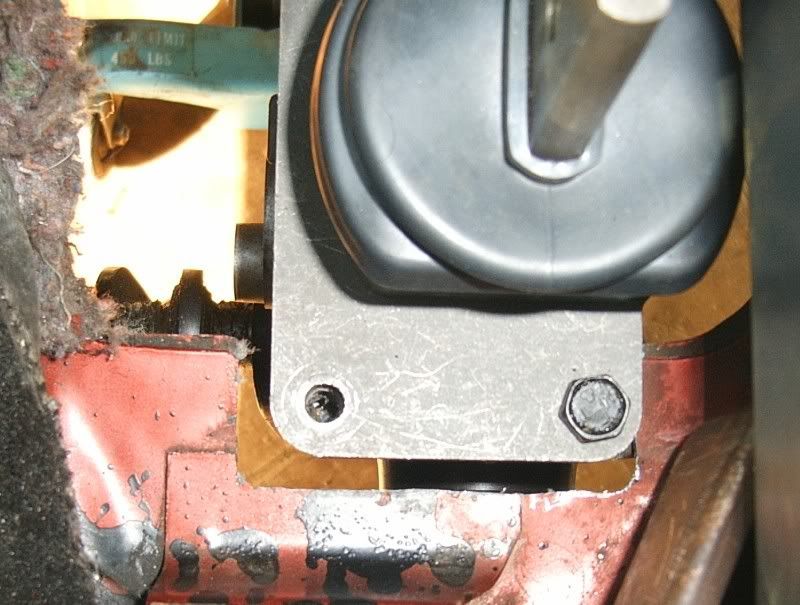
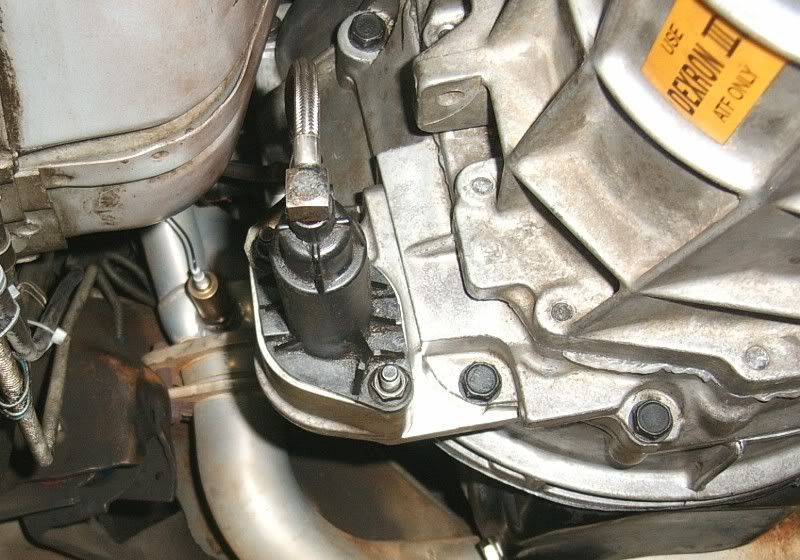
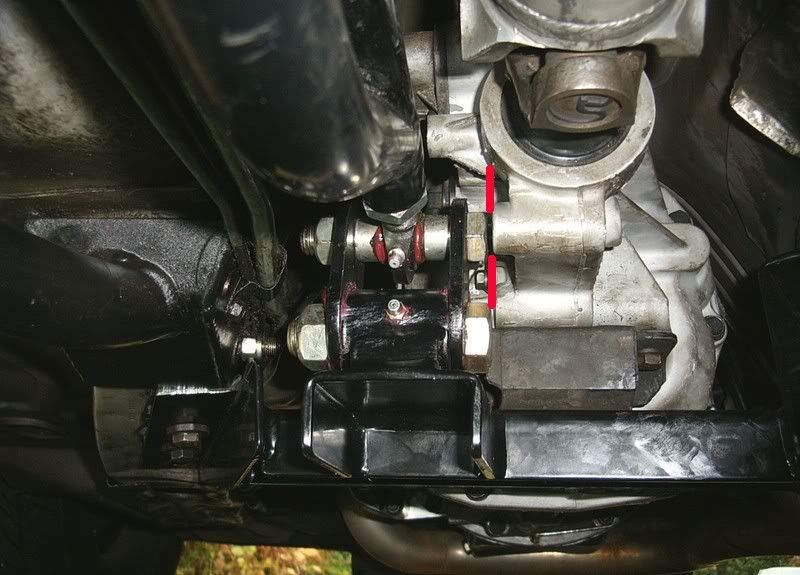
I was under my car checking for anything loose and snapped a couple of pics. John asked if I had any, so the first one is of the slave and the amount of clearance it has, and the second one is the back of the trans showing the torque arm linkage. There isn't much clearance between the upper linkage bolt and the side on the trans with a Spohn arm. About 1/8" is all. I've marked this with the two red lines so it's easy to see. The side of the trans could be milled off about 1/4" for clearance if necessary. Where you would mill for additional clearance is for one of the bosses for the stock torque arm mount, so not needed with the Spohn setup. And if you ever did want to go back to a stock setup, a couple of flat washers could be used behind the torque arm mount to take up the part that was milled away.
Third pic is of my Tremec knob I just got installed. Very nice part by the way.
 |
|
| Back to top |
|
|
Twilightoptics
Hardcore (12sec Club)
Joined: 13 Jan 2004
Posts: 9191
Location: Auburn , WA
1987 Chevrolet Camaro IROC-Z
|
| Posted: Thu Sep 18, 2008 5:54 pm Post subject: |
|
|
| I've got the same knob. Got it off eBay. Though I found one that did not say "tremec" on it. |
|
| Back to top |
|
|
alloy
T56 Elitist
Joined: 25 Jan 2004
Posts: 1716
Location: Vancouver, WA
1987 Chevrolet Camaro IROC-Z
|
| Posted: Thu Sep 18, 2008 6:04 pm Post subject: |
|
|
Well if you didn't want one with Tremec on it, I could have bought yours and you could have got another one. Dang.........wish I'd have known  |
|
| Back to top |
|
|
RSFreak
The other "John"

Joined: 23 Jan 2004
Posts: 2946
Location: Renton
1989 Chevrolet Camaro RS
|
| Posted: Mon Sep 22, 2008 6:05 am Post subject: |
|
|
That torque arm mount is BEEFY! 
_________________
'86 Trans Am - 5.0L TPI - LT1 cam - 700R4 - WS6
'85 Camaro Berlinetta - IROC clone
 |
|
| Back to top |
|
|
alloy
T56 Elitist
Joined: 25 Jan 2004
Posts: 1716
Location: Vancouver, WA
1987 Chevrolet Camaro IROC-Z
|
| Posted: Mon Sep 22, 2008 6:36 pm Post subject: |
|
|
It is pretty beefy. Had the spohn arm on for several years now and loved every minute having it. Although as you can see I did move the grease zerk to the back. I can't for the life of me figure out why he put the zerk in the front where it's almost impossible to get to.
I always do tend to change things around a little to work better............customizing (or hot rodding) I think they call it  |
|
| Back to top |
|
|
|